Replacing window glass can seem like a daunting task, but with the right approach and preparation, it can be done quickly and efficiently. Whether you’re tackling a cracked pane or completely shattered glass, following these steps will ensure the process is smooth and effective.
Assess the Damage
- The extent of damage: Is it a small crack or completely broken?
- Type of glass: Does the window use standard annealed glass, tempered glass, or specialty materials?
- Frame condition: Ensure that the frame is intact and not warped or damaged.
Based on your assessment, decide if replacing just the glass is sufficient or if additional repairs are needed.
Steps for Replacing Window Glass
- Gather Your Tools
Ensure you have all necessary tools ready before you begin. These might include: - Safety gloves
- Safety goggles
- Putty knife
- Utility knife
- Measuring tape
- Hammer and small nails
- Remove Broken Glass
Safely remove any remaining shards of broken glass. Wear protective gloves during this step to avoid injury. - Clean and Prepare the Frame
Once all remnants are removed from the old installation
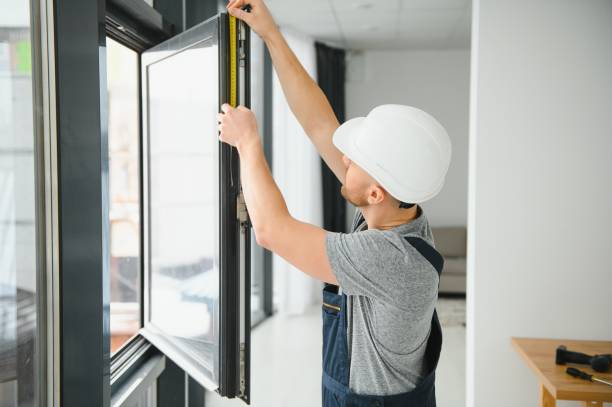
Step-by-Step Guide to Window Installation in Rockville, MD
Replacing a broken windowpane might seem like a daunting task, but with the right approach and preparation, it can be done efficiently. Follow these step-by-step instructions to ensure a smooth and safe process.
Step 1: Assess the Damage and Prepare Your Workspace
Before beginning, evaluate the extent of the damage. Determine if only the glass needs replacement or if parts of the frame are also damaged. Then, prepare your workspace:
– Clear any furniture or obstacles near the window.
– Lay down a drop cloth or tarp to catch falling debris and protect your floors.
– Wear safety gear, including gloves and eye protection.
Step 2: Remove Broken Glass Safely
Removing broken glass is one of the most critical steps to prevent injury. Here’s how to do it:
1. Remove loose shards: Carefully remove large pieces of glass by hand using thick gloves. Avoid grabbing sharp edges directly. 2. Use pliers: For stubborn shards stuck in the frame, use needle-nose pliers to gently extract them. 3. Dispose properly: Place all broken glass in a sturdy container labeled as “glass waste.” Do not mix it with regular trash.
Step 3: Clean Out the Window Frame
Once all glass shards are removed:
– Scrape away old putty or adhesive: Use a putty knife to remove any dried adhesive or residue from the frame. – Check for irregularities: Inspect for cracks, splinters, or damage within the window frame that may impede proper installation. – Sand rough areas: Smooth out uneven surfaces using sandpaper for better adhesion when installing new panes.
Step 4: Measure and Cut New Glass
Accurate measurements are key to ensuring your new pane fits snugly into place:
– Use a tape measure to record both the height and width of the window opening. – Subtract around 1/16 inch from both dimensions for expansion allowance. – If cutting yourself, use a high-quality glass cutter on sturdy flat surfaces for precision cuts. Alternatively, have it cut professionally.
| Measurement | Action | Notes |
| Height | Measure top-to-bottom | Subtract 1/16 inch |
| Width | Measure side-to-side | Subtract 1/16 inch |
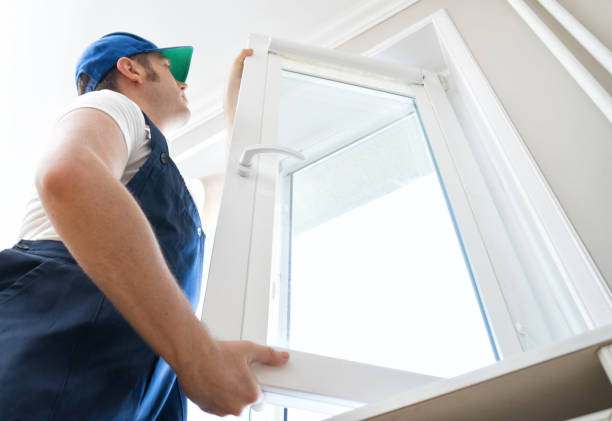
Step 5: Install New Glass Pane
Once your new pane is ready:
1. Apply glazing compound or putty along the edges of the cleaned frame. 2. Position the pane carefully into place while ensuring even pressure across all sides. 3. Secure with glazier points (small triangular clips) every few inches around its perimeter for additional stability.
Step 6: Final Touches
To finish up:
– Smooth excess putty using a putty knife at an angled motion for clean lines around edges. – Allow at least 24–48 hours for everything to set before painting or applying finishing touches.
Replacing a windowpane requires patience but remains manageable with these straightforward steps tailored towards efficiency—ensuring both safety improvements indoors alongside restored aesthetics externally without complications during execution stages thereof such projects over time!
Step-by-Step Guide to Replacement Windows Rockville, MD Homeowners Trust
Replacing a broken windowpane is an essential home repair skill that can save you both time and money. By following a systematic approach, you can ensure the process is efficient, safe, and results in a well-installed replacement. Below is a detailed guide to help you replace a broken windowpane step by step.
1. Assess the Damage
- The entire pane needs replacing or if only part of it is damaged.
- The existing frame is in good condition or requires repairs.
This initial assessment will help you decide on the materials and tools you’ll need.
2. Gather Tools and Materials
Tools: – Safety gloves – Protective eyewear – Utility knife – Putty knife or chisel – Hammer (optional) – Measuring tape
Materials: – Replacement glass pane (pre-cut to size)
– Glazier’s points
– Window putty or glazing compound
– Paint (optional, for touch-ups)
3. Remove Broken Glass Safely
Safety should be your top priority when handling broken glass.
- Wear Protective Gear: Put on safety gloves and goggles to prevent injury.
- Remove Loose Pieces: Carefully dislodge any loose shards from the frame using gloved hands or pliers.
- Use Tape for Smaller Fragments: Apply masking tape over remaining smaller pieces to keep them intact as they are removed.
- Dispose Properly: Place all glass pieces in a sturdy container designated for sharp materials.
4. Prepare the Frame
Proper preparation of the window frame ensures a snug fit for your new glass pane.
- Use a putty knife or scraper to remove old putty or glazing compound from around the edges of the frame.
- Remove any remaining glazier’s points using pliers.
- Sand down rough areas within the frame to create an even surface.
- Clean debris thoroughly with a damp cloth to ensure no obstructions remain.
Tip: If parts of your wooden frame are rotten, repair them with wood filler before proceeding.
5. Install the New Glass Pane
Once your frame is clean and prepared, it’s time to install your replacement pane.
- Measure Twice: Confirm that your replacement glass fits properly by measuring it against the frame opening.
- Position Carefully: Place the new pane into position within the frame while ensuring even spacing on all sides.
- Secure with Glazier’s Points: Insert glazier’s points every few inches along the edge of the glass, pressing them gently into place with your putty knife.
6. Apply Window Putty
- Roll glazing compound into long strips approximately ¼-inch thick.
- Press these strips around all edges where glass meets frame.
- Use your putty knife at an angle to smooth out excess compound evenly along each side.
Tip: Allow at least 24 hours for putty to cure before painting or exposing it fully to rain or moisture.
Essential Maintenance Tips for Window Repair Rockville, MD
- Inspect seals regularly for cracks or gaps that could allow air leakage.
- Touch up paint as needed on frames exposed during installation work.
- Clean windows periodically using non-abrasive cleaners suitable for glass surfaces.
By following these steps carefully, you’ll achieve professional-quality results when replacing any broken windowpane independently at home without unnecessary delays or costly mistakes.
Essential Tips for Window Glass Replacement Rockville, MD Homeowners
When undertaking a window installation project, having the right materials on hand is essential to ensure efficiency, safety, and durability. Quality materials will not only make the installation process smoother but also enhance the overall performance and longevity of your windows. Below is a detailed guide on the key materials required for a successful window installation process.
Primary Materials Needed
- Pre-fabricated or custom-made windows (double-hung, casement, sliding, etc.) depending on the size and style of your existing frame or project requirements.
- Ensure that the window glass is energy-efficient (look for Low-E coatings or double-glazing).
- Expanding foam insulation: Used to fill gaps around the frame to prevent air leaks.
- Fiberglass insulation: A reliable option for additional thermal efficiency.
- Flashing tape: Essential for sealing corners and edges to prevent water infiltration.
- Exterior caulk: Choose silicone or polyurethane-based caulks designed for outdoor use.
- Screws or nails: Corrosion-resistant fasteners (e.g., galvanized steel) are ideal for attaching the window securely to the frame.
- Wooden or plastic shims are used to level and align the window before securing it in place.
Additional Supplies
- Sealants
A high-quality sealant is critical for creating an airtight bond between the window frame and surrounding surfaces. It not only keeps out drafts but also prevents moisture damage. - Trim Pieces
Trim pieces like interior casing or exterior cladding provide a polished finish while protecting structural components from exposure to weather elements. - Drip Cap
This metal flashing sits above the window unit to redirect water away from its surface, reducing potential damage over time.
Tools That Complement Key Materials
While materials are indispensable, their proper application depends heavily on tools like utility knives, caulk guns, tape measures, spirit levels, and drills with appropriate bits.
Sample Table of Materials and Their Functions
| Material | Purpose | Example Features |
| Window Unit | Provides light, ventilation & aesthetics | Double-pane with Low-E coating |
| Insulation Foam | Prevents air leakage | Expanding polyurethane formula |
| Flashing Tape | Seals against water infiltration | Waterproof adhesive backing |
| Shims | Aligns & levels windows | Durable plastic or hardwood |
| Caulk | Ensures airtight seals | Silicone-based exterior-grade |
Investing in high-quality materials ensures that your newly installed windows will perform optimally while enhancing energy efficiency and curb appeal. Always double-check measurements before purchasing supplies to avoid unnecessary delays or misfits during installation.
Safely Removing Glass Shards from Damaged Windows Rockville, MD
When dealing with a broken windowpane, safety and precision are paramount. Broken glass poses significant risks, such as injury from sharp edges, so proper techniques should be followed. Below is a comprehensive guide to safely removing glass shards from a damaged windowpane while protecting yourself and preserving the integrity of the frame.
Step 1: Gather Necessary Safety Equipment
- Heavy-duty gloves (preferably cut-resistant)
- Safety goggles or glasses
- Long-sleeved shirt and sturdy pants
- Utility knife or putty knife
- Painter’s tape or duct tape
- Pliers (needle-nose preferred)
- Dustpan and brush or vacuum cleaner with a hose attachment
Step 2: Assess the Damage
Begin by carefully inspecting the damaged windowpane. Determine if any large shards are still intact within the frame. This step allows you to plan your removal process effectively without causing additional damage.
- Check for loose shards that may fall during removal.
- Identify areas where glass is firmly stuck in the frame.
Step 3: Secure Any Remaining Glass Pieces
To prevent loose shards from falling unexpectedly during removal, apply painter’s tape or duct tape across the remaining pieces of glass in an “X” pattern. This will hold them together temporarily until you can remove them safely. For larger sections, add extra strips of tape for added security.
Step 4: Remove Loose Shards First
- Use needle-nose pliers to gently grip and lift each shard out of the frame.
- Place removed shards directly into a thick paper bag or sturdy cardboard box for safe disposal.
- For tiny fragments left on the surface, use a dustpan and brush or vacuum them up carefully.
Pro Tip: Avoid using your hands directly, even with gloves on, as some edges might still penetrate protective material.
Step 5: Address Stubborn Pieces in the Frame
- Use a utility knife or putty knife to loosen edges around the shard.
- Carefully wiggle stubborn pieces free using pliers.
- Avoid applying excessive force that could damage the frame.
If needed, soften old glazing putty with heat (a hairdryer set on low works well) before attempting removal.
Step 6: Clean Up Remaining Debris
- Thoroughly inspect for any smaller fragments hidden within grooves or corners of the frame.
- Vacuum along edges where microscopic splinters may remain.
- Wipe down surfaces using a damp cloth to pick up residual particles.
| Safety Tip | Always double-check that no glass fragments remain before proceeding with repairs or installation tasks. Even small splinters can pose hazards later on. |
By following these steps carefully, you’ll create a safe working environment while ensuring that your window frame is ready for subsequent repairs or replacement tasks without unnecessary delays or risks involved in handling broken glass improperly.
Preparing the Frame for New Glass Installation: A Comprehensive Guide
Properly preparing the frame is a critical step in ensuring a secure and lasting installation of new window glass. Skipping or rushing this part of the process can lead to improper sealing, drafts, or even structural damage to your window over time. Below is a detailed guide to help you prepare the frame effectively.
Step 1: Assess the Existing Frame
- Rot or decay on wooden frames: This is especially common in older windows exposed to moisture. Use a knife or screwdriver to probe for soft spots.
- Cracks or splits: Inspect for visible cracks that may compromise structural integrity.
- Corrosion on metal frames: Check for rust or pitting which could weaken its strength.
If damage is extensive, repairs may be necessary before proceeding with installation.
Step 2: Gather Necessary Tools
| Tools | Purpose |
| Utility knife | To cut away old putty or sealant |
| Putty knife | For scraping off debris from the frame |
| Screwdriver | To remove leftover screws or hardware |
| Sandpaper (medium/fine grit) | Smoothens out rough surfaces |
| Wire brush | Removes rust and dirt from metal frames |
In addition to tools, keep cleaning supplies such as rags, soapy water, and a vacuum nearby for cleaning debris.
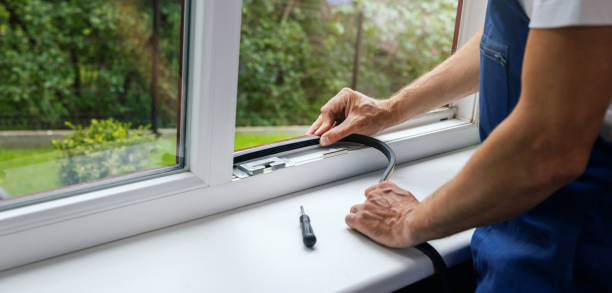
Step 3: Remove Old Putty and Sealant
Using a utility knife or putty knife, carefully scrape away any remaining putty around the edges of the frame where the old glass was secured. Be thorough but gentle—excessive force could damage fragile sections of wooden frames. For stubborn areas, use a heat gun set at low temperature to soften hardened putty before removal.
Step 4: Clean Out Debris
- Use a brush or vacuum to clear out smaller particles within grooves.
- Wipe down with soapy water on wood frames (or an appropriate cleaner for metal) to eliminate dust and grime.
- Dry completely using lint-free cloths before moving forward.
Neglecting this step may compromise adhesion during later stages like applying glazing compounds.
Step 5: Address Damage if Necessary
- Fill them with wood filler.
- Allow ample drying time based on product instructions.
- Sand smooth with fine-grit sandpaper.
- Apply rust remover using steel wool.
- Afterward, consider priming exposed metallic surfaces with anti-corrosive paint.
This will prevent further deterioration while improving long-term stability.
Step 6: Test Frame Fit
- Measure all sides of your window opening using a tape measure.
- Compare these dimensions against your replacement glass pane—ensure it matches perfectly without gaps.
- Dry fit (place) the pane into position without securing it permanently yet; this checks compatibility between frame prep work and pane sizing.
By following these steps carefully when preparing your window frame for new glass installation, you’ll set yourself up for success while reducing potential future issues related to improper sealing or alignment during final assembly stages.
How to Properly Apply Putty and Secure the New Glass Pane
Applying putty and securing a new glass pane is a critical step in window installation or repair. Proper technique not only ensures a professional finish but also enhances the durability and energy efficiency of the window. Follow this guide for best practices.
Why Proper Putty Application Matters
Using putty correctly serves several purposes, such as: – Sealing Gaps: Ensures no air or moisture leaks through. – Securing the Glass: Keeps the pane firmly in place against environmental impacts. – Aesthetic Finishing: Provides a smooth, clean look around the glass.
Neglecting this step can lead to drafts, increased energy bills, and potential damage over time.
Tools and Materials You’ll Need
Before starting, gather these essential tools: – Glazier’s putty or glazing compound
– A high-quality putty knife (flexible blade recommended)
– Linseed oil (optional for softening old-fashioned putty)
– Clean rags or paper towels
– A utility knife (for trimming excess material)
Ensure your tools are clean and free of debris to avoid imperfections during application.
Step-by-Step Guide to Applying Putty
- Remove any old putty remnants with a scraper or utility knife.
- Ensure that no residue or dust remains, as this can prevent proper adhesion. Consider lightly sanding wood frames if they feel rough.
- Knead the putty by hand until it becomes pliable. For pre-mixed compounds, ensure an even consistency throughout.
- If using traditional linseed oil-based putty, warming it slightly in your hands can make handling easier.
- Roll small portions of putty into long strips about ¼ inch thick. These strips will act as the base layer around the frame’s rabbet groove (the recess where glass sits).
- Press rolled-out strips into place inside the rabbet groove evenly. Smooth them out with your fingers or a flat edge.
- Gently place your new pane onto the applied base layer of putty.
- Ensure that it is centered within the frame before applying pressure.
- Insert glazier points along all sides of wood frames for extra reinforcement before sealing with additional compound.
- Roll another set of thin strips and press them onto edges where glass meets frame.
- Use your putty knife at a 45° angle to smooth out visible edges while ensuring uniform thickness across sections.
- Inspect for lumps or excess compound sticking out from corners.
- Carefully trim away any unnecessary material using a sharp utility blade without scratching surfaces.
Tips for Perfect Results
Here are some tips for achieving professional-looking results: – Keep both hands slightly damp while kneading oil-based glazing compounds to prevent sticking. – Avoid overloading corners with extra material; flatten transitions smoothly instead. – Allow sufficient drying time as specified by manufacturers—typically 7–14 days for older compounds—before painting over exposed areas if required.
| Drying Time | Compound Type | Paintable After |
| Fast-dry | Latex-based | 48 hours |
| Traditional | Linseed oil-based | 7–14 days |
Proper application ensures not only functional windows but also enhances curb appeal by creating neat finishes around every panel replacement job you undertake professionally.
- Exploring the Advantages of Professional Installation for Windows Rockville, MD
- A Comprehensive Guide to Choosing New Construction or Replacement Windows in Rockville, MD
- Efficient Tips for Window Replacement Rockville, MD Homeowners Should Know
- What to Expect During a Window Installation in Rockville, MD
- Expert Tips for DIY Installation of Windows Rockville, MD Homeowners Will Love
- Preparing for Window Replacement Rockville, MD: Tips for a Smooth Installation Process